2010-01-26

£1,000 for Bletchley Park thanks to The Geek Atlas

When The Geek Atlas was published in June 2009, O'Reilly's UK arm decided to pledge to donate 50p per copy sold in the UK to help fund Bletchley Park.

O'Reilly has now made good on that pledge and with almost 2,000 copies of the book sold in the UK it has donated £1,000 to Bletchley Park.


And the 50p per copy pledge continues. All copies of The Geek Atlas sold in the UK result in a 50p donation to keep this wonderful place alive.

2010-01-23

Price drop on GNU Make Unleashed

I've dropped the price on GNU Make Unleashed to €15.00 (for the printed book) and €10.00 (for the PDF).


And I'm working on a version for the Kindle.

2010-01-22

Update list of my GNU Make articles

A reader pointed out that the GNU Make article list on by writing page is full of broken links because CM Crossroads has reorganized their site without providing backwards compatibility.

So you are faced with a choice: you could buy a copy of my book The GNU Make Book which contains all the articles (and more!), or you could use the following list (which I've newly updated):

May 2008: Usman's Law
March 2008: GNU Make user-defined functions, part 2
February 2008: GNU Make user-defined functions, part 1
December 2007: GNU Make path handling
October 2007: GMSL 1.09: A look inside the tweaks and updates
September 2007: Makefile Debugging: An introduction to remake
July 2007: GNU Make escaping: a walk on the wild side
June 2007: Painless non-recursive Make
May 2007: Atomic Rules in GNU Make
April 2007: GNU Make meets file names with spaces in them
February 2007: GNU Make's $(shell)/environment gotcha
December 2006: Makefile Optimization $(eval) and macro caching
November 2006: The pitfalls and benefits of GNU Make parallelization
October 2006: Tips and tricks from the automatic dependency generation masters
September 2006: Sorting and Searching
August 2006: Target-specific and Pattern-specific GNU Make macros
July 2006: Making directories in GNU Make
June 2006: Rebuilding when a file's checksum changes
May 2006: What's new in GNU Make 3.81
April 2006: Tracing rule execution in GNU Make
March 2006: Rebuilding when CPPFLAGS changes
February 2006: Dynamic Breakpoints in the GNU Make Debugger
December 2005: Adding set operations to GNU Make
November 2005: What's New in GMSL 1.0.2
October 2005: An Interactive GNU Make Debugger
August 2005: Makefile Assertions
July 2005: The Trouble with $(wildcard)
June 2005: GNU Make Gotcha ifndef and ?=
March 2005: The GNU Make Standard Library
February 2005: Learning GNU Make Functions with Arithmetic
January 2005: Self-documenting Makefiles
December 2004: Learning Make with the Towers of Hanoi
November 2004: Makefile Optimization $(shell) and := go together
October 2004: Makefile Debugging: Tracing Macro Values
September 2004: Setting a Makefile variable from outside the Makefile
August 2004: The Trouble with Hidden Targets
July 2004: Dumping every Makefile variable
June 2004: Printing the value of a Makefile variable

I'll update the list on my web site later.

2010-01-14

Mendelian Randomization: getting genes to run randomized trials for you

One of the core elements of my day job is dealing with causal relations: we try to understand what cause caused an effect. An area where much work has been done in understanding causal relationships is medicine where randomized controlled trials are used to understand the relationship between taking a medicine and some outcome.

But some things are hard to perform a trial on. It's all very well if you have a medicine to try out, but what if you want to know if, for example, having low serum cholesterol is associated with an increased risk of cancer?

That's not an idle question, the Framingham Heart Study, was thought to have shown a relationship between serum cholesterol and cancer (e.g. The serum cholesterol-cancer relationship: an analysis of time trends in the Framingham Study). But the question is: given that there appears to be a relationship, is it causal? Does low serum cholesterol cause cancer?

It could be that it's the other way around (called reverse causation: Low Cholesterol May Be Marker of Undiagnosed Cancer): if you are likely to get cancer you are likely to have low serum cholesterol. Or it could be that there's a confounding factor: something causes both low serum cholesterol and cancer.

It turns out that genetics, and specifically the fact that genes are randomly assigned during meiosis (in humans, for example, half the genes come from the mother and half from the father). Gregor Mendel's law of independent assortment says that the alleles of genes are chosen randomly from the possible alleles when a baby is being formed from the genetic material of mother and father.

This Mendelian Randomization means that it's possible to have nature perform a randomized trial for you. If you can find an allele that affects the trait you are trying to understand you can use it to sample the population to look for a cause and effect relationship.

In the case of low serum cholesterol there's a specific allele associated with Apolipoprotein E. The variant Apo E2 is associated with low serum cholesterol. And because of Mendel's law of independent assortment it will be assigned randomly in the population.

In 1986 Martijn B. Katan published a letter in The Lancet pointing out that Apo E2 causes a rare disease where patients have almost zero serum cholesterol.

Since Apo E2 is randomly assigned by Mendel's laws it's enough to look at the population and examine cancer rates and their relationship to the presence of the Apo E2 gene. So a 'trial' can be run by selecting a control group from the population and examining the rate of Apo E2 in that control. Then a group with cancer is tested for Apo E2.

If there's really a connection between low serum cholesterol and cancer then the cancer group should have a higher prevalence of Apo E2 than the control. You can think of the presence of Apo E2 being random across the population, if it's less than random in the cancer group (i.e. there's more or less than expected) then a causal relationship can be inferred. One way to see that is to look at a causal diagram of the relationships.


The arrows in the diagram represent causal relationships.

1. There's an arrow from Apo E2 to serum cholesterol because it is known that this allele causes low serum cholesterol.

2. The hypothesis is expressed in the arrow from low serum cholesterol to cancer. It's that arrow that's being determined.

3. There are other factors (age, diet, location, illnesses) which could affect both serum cholesterol and cancer.

4. There's no arrow leading to Apo E2 because it is completely determined by Mendel's laws. There's also no arrow from Apo E2 directly to the other factors because they are not affected by Apo E2.

5. There's no arrow directly from Apo E2 to cancer because there's no known direct relationship between the two.

(Note that these assumptions have to be justified. For example, #1 needs biological justification, as does #5).

With those relationships in place it's just a matter of performing the statistical test on the control group and cancer group to see if more Apo E2 is present in the cancer group (there's more on that in Mendelian randomization as an instrumental variable approach to causal inference).

This technique has been used to show a causal relationship between alcohol intake and blood pressure (see Alcohol Intake and Blood Pressure: A Systematic Review Implementing a Mendelian Randomization Approach) and to show no causal relationship between a mother's BMI and the fatness of her offspring (see Exploring the Developmental Overnutrition Hypothesis Using Parental–Offspring Associations and FTO as an Instrumental Variable).

And what of low serum cholesterol and cancer? A study (Apolipoprotein E Genotype, Plasma Cholesterol, and Cancer: A Mendelian Randomization Study) from 2009 concludes: "These findings suggest that low cholesterol levels are not causally related to increased cancer risk."

Thanks, Mendel!

2010-01-09

Simplifying my OLPC XO-1 Temperature Sensor

Back in 2008 I wrote about a little circuit to turn the OLPC XO-1 Measure application into a digital thermometer. That circuit required two 9 volt batteries, 11 components and a PCB (plus connectors)

A few weeks ago I got asked about making a commercial version of the probe which naturally led to thinking about how to simplify the circuit. I've now got the entire circuit down to a single component that costs 50p in bulk. I've eliminated all the rest (except the connectors) and the circuit is entirely powered by the OLPC itself.

I actually tried a total of four designs for this circuit.

Design 1: The Original The original circuit looked like this:


It works, but it's a bit awkward since it requires those external batteries.

Design 2: Dump the op-amp One simple thing to do is just make a parallel adder with a few resistors and a reference voltage (the original 0.45v from Design 1) from a voltage divider and not worry about all the stability that the op-amp brings.

Here's that circuit under test. It works, but it can be made even simpler.


Design 3: Diode bias After mentioning this project on Hacker News jacquesm suggested trying an even simpler circuit: the original LM35 temperature sensor with a diode inserted between its ground pin and ground to bias ground to the forward voltage drop of the diode (typically 0.6v) which would bring the output voltage for household temperatures into the range of the OLPC.

That worked nicely (I had a 1N4007 lying around which has a forward voltage of up to 1.1v) and here's the circuit.


Design 4: Switch the sensor And then I discovered that there's a pin compatible replacement for the LM35 called the TMP36 which output 0.75v at 25C with 0.01v per C. That means that at 0C it outputs 0.5v and at 100C it output 1.75v. That puts its output inside the range the OLPC can sense. And it can run on the 5V from the USB port. And it has low output impedance.

So the final circuit has a single component. Here it is under test:


And here it is soldered to a connector ready for connection to the OLPC via my original USB/Mic In connector cable.


So if you want to make a really simple temperature probe for the OLPC XO-1 then get a TMP36.

Now all I need to do is find a supplier of stainless steel probes to put the TMP36 in and I can start making them.

PS Ever since I had eye surgery and stopped wearing glasses I've been worried about splashing solder in my eyes. So I wear a pair of Panther Vision LED Lighted Safety Glasses which protect the eyes and let you see what you are doing at the same time.

Don't you wish your boyfriend was hot like me

2010-01-06

The Ikea Lillabo Processing code

By popular demand... here's the code, written in Processing that actually draws the train sets. I hadn't released it because I didn't think it was very interesting, but you are welcome to it.
// --------------------------------------------------------------------------
//
// Small program to draw pictures of Ikea Lillabo track layouts using
// instructions derived from my Perl program.
//
// Written by John Graham-Cumming (http://www.jgc.org/)
//
// Released under the General Public License, version 2
//
// --------------------------------------------------------------------------

// This is the cursor position (x, y) coordinates and angle to the
// horizontal

float x, y, a;

// The length in pixels of a single straight piece

float len = 40;

// See the Perl program for a full explanation, but there are 8 curves
// in a circle and from that the radians of curve arc, the length of the
// straight line between the curve ends and the curve angle to the
// horizontal can be calculated.

float curves_in_circle = 8;
float radians_in_curve = 2 * PI / curves_in_circle;
float curve_angle = radians_in_curve / 2;
float curve_length = len * 2 * cos(PI/2 - radians_in_curve/2);

// The Processing equivalent of main()
void setup() {

// Set up the basic parameters for the drawing: a 1000x1000 canvas,
// with a white background. None of the elements drawn will be filled
// and the lines will be four pixels wide.

size(1000,1000);
background(255,255,255);
strokeWeight(4);
noFill();

// These are the nine possible layouts discovered by the Perl program
// and were copy/pasted here. Clearly this would be better done
// dynamically with this program reading the Perl program's output.

int layouts = 9;
String s[] = new String[layouts];

s[0] = "AAAACCAAAASSAAB";
s[1] = "CCCCCCSSAAAAAAB";
s[2] = "CAAAAACASSAAAAB";
s[3] = "CAAAAASCASAAAAB";
s[4] = "CAAAAASSCAAAAAB";
s[5] = "AAACAACAAASSAAB";
s[6] = "ACAAAASACSAAAAB";
s[7] = "ACAAAASSACAAAAB";
s[8] = "AACAAASSAACAAAB";

// (row, col) is the row and column position of the next layout to draw
// starting from the top left of the canvas. Since we know there are
// 9 the loop below lays them out 3x3. h is the height of space
// reserved for a layout.

int row = 0;
int col = 0;
int h = 250;
int w = h + 50;

for ( int j = 0; j < layouts; j++ ) {

// Start 200 pixels from the top left corner and with an initial
// angle of 0

a = 0;
x = 200 + w * col;
y = 200 + h * row;
col++;

if ( col == 3 ) {
col = 0;
row++;
}

for ( int i = 0; i < s[j].length(); i++ ) {
switch(s[j].charAt(i)) {
case 'B':
bridge();
break;

case 'C':
clockwise();
break;

case 'A':
anticlockwise();
break;

case 'S':
straight();
break;
}
}
}
}

// Function to draw a piece and update (x, y) and a
void draw_piece( float l, // Length of piece to be drawn
float ang ) // The angular change due to the piece
{
// If the ang is zero then this is a straight piece so use line(), if
// non-zero then it's a curve and so use arc()

if ( ang == 0 ) {

// (dx, dy) is the end of the piece truncated (the 0.8 multiplier)
// to leave a little gap between pieces.

float dx = x + l * 0.8 * cos(a + ang);
float dy = y + l * 0.8 * sin(a + ang);
line( x, y, dx, dy );
} else {
int h = (ang<0)?-1:1;

// (ox, oy) is the location of the centre of the circle on which the
// arc we are drawing lies. s and e are the starting and ending angles
// of arc to draw. Note that s must be less than e. Note the 1.5 here
// is used to shorten the arc to leave a small gap between pieces.

float ox = x - h * len * cos(PI/2-a);
float oy = y + h * len * sin(PI/2-a);
float s = a;
float e = a + ang * 1.5;
if ( s > e ) {
float t = e;
e = s;
s = t;
}

// The PI/2 adjustment here is needed because the angles in s and e are
// derived from a which is to the horizontal and the arc() function needs
// angles to the vertical

ellipseMode(CENTER);
arc( ox, oy, len*2, len*2, s - h * PI/2, e - h * PI/2 );
}

// Update (x,y) and a to be at the end of the new piece that's been
// added and with the correct orientation.

x += l * cos(a + ang);
y += l * sin(a + ang);
a += 2 * ang;
}

// Four functions to draw the four pieces giving them different colours.

void bridge()
{
stroke(255,0,0);
draw_piece(2*len,0);
}

void straight()
{
stroke(0,255,0);
draw_piece(len,0);
}

void clockwise()
{
stroke(255,0,255);
draw_piece(curve_length,curve_angle);
}

void anticlockwise()
{
stroke(0,0,255);
draw_piece(curve_length,-curve_angle);
}

2010-01-05

More fun with toys: the Ikea LILLABO Train Set

As further proof of my unsuitability to be a child minder (see previous post) I found myself playing with an Ikea LILLABO 20-piece basic set train.
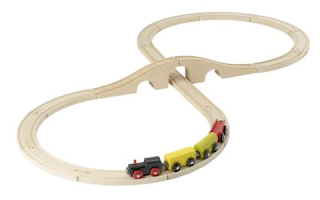


The train set has 16 pieces of track (12 curves, two straight pieces and a two part bridge) and 4 pieces of train. What I wondered was... how many possible looping train tracks can be made using all 16 pieces?

The answer is... 9. Here's a picture of the 9 different layouts.
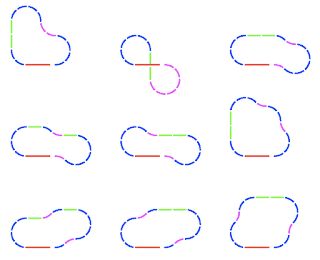


The picture was generated using a little program written in Processing. The bridge is red, the straight pieces are green and the curves are blue or magenta depending on whether they are oriented clockwise or anticlockwise. The curved pieces can be oriented in either way.

To generate those layouts I wrote a small program which runs through all the possible layouts and determines which form a loop. The program eliminates duplicate layouts (such as those that are mirror images of each other).

It outputs a list of instructions for building loops. These instructions contain 15 characters C (clockwise curve), A (anticlockwise curve), S (straight piece) and B (the entire bridge). Here are the building instructions for all the shapes in the picture above:

AAAACCAAAASSAAB
CCCCCCSSAAAAAAB
CAAAAACASSAAAAB
CAAAAASCASAAAAB
CAAAAASSCAAAAAB
AAACAACAAASSAAB
ACAAAASACSAAAAB
ACAAAASSACAAAAB
AACAAASSAACAAAB

PS You can actually create more possible layouts than these because the Ikea pieces have a lot of play in them and can be abused to form other shapes. But where's the fun in that?

PPS Ikea can actually double the fun by adding just two more pieces. If they added two more curved pieces the number of possible tracks doubles to 18. If they added four curved pieces then the number of possible tracks goes to 130.

PPPS Here's the code
use strict;
use warnings;

# ----------------------------------------------------------------------------
# Program to determine all the possible valid closed loop train tracks
# possible using the Ikea Lillabo 20-piece basic train set (see
# http://www.ikea.com/gb/en/catalog/products/30064359). Note that
# although this is 20-piece there are only actually 16 pieces of track
# (the train itself is in four pieces).
#
# Written by John Graham-Cumming (http://www.jgc.org/)
#
# Released under the General Public License, version 2
#
# v1.0 - First public release
# ----------------------------------------------------------------------------

# Universal constant derived from 1 Kings 7:23 :-)

my $PI = 3.1415927;

# The length of a single straight piece. For the purposes of the
# program this is set at one but could be made into a real value if
# you wanted to output actual track lengths.

my $unit = 1;

# The number of curved pieces that make a full circle. Determined
# empirically. And the angle of the segment determined by a single
# curved piece in a circle.

my $curves_in_circle = 8;
my $radians_in_curve = 2 * $PI / $curves_in_circle;

# The 15 possible pieces: a straight edge (which has $unit length) and
# is used as the measurement for everything else, a bridge (which is
# twice the length of the straight edge; it is actually supplied in
# two pieces but for the purposes of this program is considered to be
# a single piece) and a curve (using $radians_in_curve above the
# length of the straight line between the ends of the curve is
# calculated).
#
# Each entry consists of three parts:
#
# length: the length in a straight line between the ends of the piece
# at its centre.
#
# angle: the angle (in radians) between the straight line through the
# piece and a tangent to the curve at the piece's start. This only
# applies to curved pieces where the straight line is the line joining
# its two endpoints.
#
# count: how many of these pieces are supplied.
#
# Note that curves can be placed in either a clockwise or
# anticlockwise direction. The program detects this by looking at the
# angle. If it's non-zero then the piece has two orientations.

my %pieces = (
Bridge => { length => $unit * 2,
angle => 0,
count => 1 },

Straight => { length => $unit,
angle => 0,
count => 2 },

# Here's a curved piece, the angle a is $radians_in_curve, the
# length l of a side is $unit. So length is the distance between
# the points labelled s and f. Bisect the angle a you get a right
# angle triangle with hypotenuse of length $unit and angle at the
# vertex of $radians_in_curve/2. So the angle b is $PI/2 -
# $radians_in_curve/2. By simple trigonometry the length is twice
# $unit * cos($PI/2-$radians_in_curve/2).
#
# s
# C
# . . C
# . b C
# l . . C
# . C
# . . C
# . a C
# . . . . . . . C
# o f
#
# To calculate the angle to the tangent at point s (the angle c),
# note that the angle formed by os and the tangent is a right angle
# (since os comes from the centre of the circle). So b+c is $PI/2
# but b is $PI/2 - $radians_in_curve/2 and so c is
# $radians_in_curve/2
#
# s
# .
# . . .
# . b c .
# l . . .
# . .
# . . .
# . a .
# . . . . . . . . . . .
# o f
#
Curve => { length => 2 * $unit * cos($PI/2-$radians_in_curve/2),
angle => $radians_in_curve/2,
count => 16 }
);

# This structure contains the position of the end of the current
# placed track (the X and Y coordinates) and the angle of the end of
# the piece of track in radians to the horizontal. Initially this is
# defined as location (0,0) and with an angle of 0.
#
# The goal will be to place pieces such that the cursor ends up at the
# %origin.

my %origin = (
angle => 0,
x => 0,
y => 0
);

# Some basic test tracks to make sure that the code does what I
# expect. This hash contains track layouts and the expected final
# position of the cursor for tests

my %tests = (
  B => { x => 2 * $unit, y => 0, angle => 0 },
  S => { x => $unit, y => 0, angle => 0 },
  C => { x => 0.707, y => 0.293, angle => 0.785 },
  A => { x => 0.707, y => -0.293, angle => -0.785 },
  AA => { x => 1, y => -1, angle => -1.570 },
  CC => { x => 1, y => 1, angle => 1.570 },
  BSS => { x => 4 * $unit, y => 0, angle => 0 },
  CCCC => { x => 0, y => 2 * $unit, angle => 0 },
  AAAA => { x => 0, y => -2 * $unit, angle => -3.14 },
  CCCCCCCC => \%origin,
CCCCCCCCCCCCCCCC => \%origin,
AAAAAAAA => \%origin,
AAAAAAAAAAAAAAAA => \%origin,
BCCCCCCSSAAAAAA => \%origin,
CCCCSCCCCS => \%origin,
CCCCACCACCCCACCA => \%origin
);

foreach my $t (sort keys %tests) {
my %ac = %origin;
my @as = split( '', $t );
build_track( \%ac, \@as );
if ( !cursor_match( \%ac, $tests{$t} ) ) {
die "Test $t failed: $ac{x} $ac{y} $ac{angle}\n";
}
}

# To avoid getting the same track in different directions we keep
# track of tracks that we've found for testing. The keys of this hash
# are the strings that describe the track layout (e.g. CCCCCCSSAAAAAA
# without the bridge piece).

my %found;

# Since there are only two interesting pieces of track (curve and
# straight) the algorithm for trying out all the combinations of
# pieces is broken into two parts. The outer loop runs through all
# combinations of curved pieces joined together with each piece
# getting to go clockwise or anticlockwise. This is done by
# generating all binary numbers between 0 and 2^12-1 (i.e. all 12 bit
# binary numbers) and using the bits to indicate whether a track piece
# goes clockwise (a 0) or anticlockwise (a 1).
#
# To avoid seeing the same track twice in symmetrical layouts the
# curved pieces are constrained to always finish with an anticlockwise
# piece. This is done by making the top bit in this loop be 0 by
# reducing the top number to 2^11-1

foreach my $curve (0..2**($pieces{Curve}{count}-1)-1) {

# Create an array containing the instructions for inserting
# pieces. The array is alpha and has entries B, C, A and S. A means
# add curved piece anticlockwise, S means add straight piece, C
# means a curved piece clockwise and B a bridge. This array will be
# fed into move_cursor to build the final track.
#
# The following piece of code uses the sprintf function to extract
# the bits from the $curve value into an array and then transform a
# 0 bit to A and a 1 bit to C.

my @instructions = map {$_?'C':'A'}
split( '', sprintf( "%0$pieces{Curve}{count}b", $curve ) );

# Then for each combination of curved pieces it's just a question of
# inserting the straight pieces in all possible positions. If there
# are 12 curved pieces then there are 13 possible places each
# straight piece can be inserted.
#
# To make it possible to modify the number of straight pieces the
# program doesn't assume that there are only two (which could just
# have been done with a pair of loops). So an array is initialized
# that will contain the positions of the n straight pieces and it is
# used to create the combinations.
#
# The initial position of the straight pieces is 0 and then 0
# (assuming just two) indicating that they are inserted before the
# first curved piece.

my @straight;

foreach my $i (0..$pieces{Straight}{count}-1) {
$straight[$i] = 0;
}

# Now run through all the possible valid straight positions and
# insert them into the curved positions

while (1) {
my @in = @instructions;

# Add the straight pieces to the list of 'instructions' at the
# appropriate places and then place the pieces. This creates a
# new array, @build, containing the track layout.

my @build;
my $s = 0;
my $c = 0;
while ( ( $s < $pieces{Straight}{count} ) ||
( $c < $pieces{Curve}{count} ) ) {
if ( $s < $pieces{Straight}{count} ) {
if ( $straight[$s] == $c ) {
push @build, ('S');
$s += 1;
next;
}
}

if ( $c < $pieces{Curve}{count} ) {
push @build, ($in[$c]);
$c += 1;
}
}

# Now add the bridge at end. Since there's only one bridge this
# simplification is made and it makes no difference to the outcome
# since all other combinations of straights and curves will be
# generated.

push @build, ('B');

my %cursor = %origin;
build_track( \%cursor, \@build );

# Finally see if this track layout results in a loop. The test
# for this is simple: is the last piece (represented by the
# %cursor) at the %origin position and orientation?
#
# If it matches in one direction then pop off the bridge, reverse
# the track, push back the bridge and try to rebuild. This will
# eliminate tracks that don't actually match up because the final
# piece approaches the bridge from the wrong direction.

if ( cursor_match( \%cursor, \%origin ) ) {
pop @build;
%cursor = %origin;
my $build1 = join('',@build);
@build = reverse @build;
my $build2 = join('',@build);
push @build, ('B');
my $build1a = $build1;
$build1a =~ tr [AC] [CA];
my $build2a = $build2;
$build2a =~ tr [AC] [CA];

if ( !exists( $found{$build1} ) ) {
build_track( \%cursor, \@build );
if ( cursor_match( \%cursor, \%origin ) ) {
my $build3 = undef;
if ( $build1 =~ /^(.*)SS(.*)$/ ) {
$build3 = join('',reverse split('',$1)) .
'SS' . join('',reverse split('',$2));
}
if ( !defined( $build3 ) ||
!exists( $found{$build3} ) ) {
print @build, "\n";
$found{$build1} = 1;
$found{$build2} = 1;
$found{$build1a} = 1;
$found{$build2a} = 1;
if ( defined( $build3 ) ) {
$found{$build3} = 1;
}
}
}
}
}

# Move the straight pieces to their next positions, this is where
# the while loop will exit once all the positions have been tried.

foreach my $i (0..$pieces{Straight}{count}-1) {
my $j = $pieces{Straight}{count}-1-$i;
if ( $straight[$j] < $pieces{Curve}{count} ) {
$straight[$j] += 1;
last;
} else {
$straight[$j] = -1;
}
}

foreach my $i (1..$pieces{Straight}{count}-1) {
if ( $straight[$i] == -1 ) {
$straight[$i] = $straight[$i-1];
}
}

my $terminate = 1;

foreach my $i (0..$pieces{Straight}{count}-1) {
if ( $straight[$i] != $pieces{Curve}{count} ) {
$terminate = 0;
last;
}
}

if ( $terminate ) {
last;
}
}
}

# Subroutine used to place a piece of track. It updates a %cursor
# hash passed to it
sub move_cursor
{
my ( $c, # Reference to the %cursor hash to be updated
$p, # Name of the piece be added
$h ) = @_; # Handedness for curved piece (1 or -1), omit if
# non-curved

if ( !defined( $h ) ) {
$h = 0;
}

$c->{x} += $pieces{$p}{length} * cos($c->{angle} +
$h * $pieces{$p}{angle});
$c->{y} += $pieces{$p}{length} * sin($c->{angle} +
$h * $pieces{$p}{angle});

if ( $h != 0 ) {
$c->{angle} += 2 * $h * $pieces{$p}{angle};
}
}

# Subroutine to build an entire track from a list of track pieces
# (with single character identifiers)
sub build_track
{
my ( $c, # Reference to the %cursor to update
$in ) = @_; # Reference to the list of build instructions

# This maps the characters in the @$in array into piece names and
# handedness (for the curved pieces). Note that direction is
# missing for the straight pieces and the undefined value is used in
# the following loop and passed to move_cursor for those
# pieces. move_cursor knows how to deal with this.

my %m = (
'A' => { piece => 'Curve', direction => -1 },
'B' => { piece => 'Bridge' },
'C' => { piece => 'Curve', direction => 1 },
'S' => { piece => 'Straight' } );

foreach my $i (@$in) {
move_cursor( $c, $m{$i}{piece}, $m{$i}{direction} );
}
}

# Determine whether two cursors represent the same position and
# orientation. Return 1 if so, 0 otherwise.
sub cursor_match
{
my ( $c, $d ) = @_; # References to two %cursor hashes

my $dx = round($$c{x}-$$d{x});
my $dy = round($$c{y}-$$d{y});
  my $da = round(($$c{angle}-$$d{angle})/$PI);
$da -= int($da);

return ( ( $dx == 0 ) &&
( $dy == 0 ) &&
( $da == 0 ) );
}

# Perform rounding on a number to two decimal places
sub round
{
my ( $a ) = @_;

return int($a*100 + 0.5*($a <=> 0))/100;
}

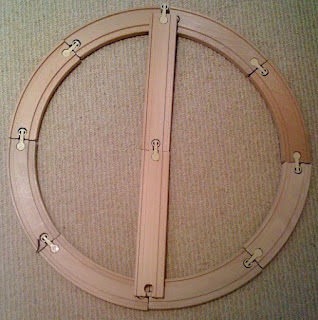
PPPS Here's how I determined that a full circle was made up of eight curved pieces with a radius of one straight piece:


Update I received a message from Ikea about this:

Dear John

Thank you for sharing our passion for childrens products. It is very good for us to get input like this. I will forward your idea to the product developer who is responsible for our toys and maybe this improvements will be something for us to concider.
Thanks again for taking your time to give us feed back.

Best regards
Maria Thörn
Range manager childrens IKEA