2021-11-08

Making an old USB printer support Apple AirPrint using a Raspberry Pi

There are longer tutorials on how to connect a USB printer to a Raspberry Pi and make it accessible via AirPrint but here's the minimal one that's just a list of commands and simple instructions.

1. Install Raspbian on a SD card

2. Mount SD card on some machine and navigate to /. Add a file called ssh and set up wpa_supplicant.conf for WiFi access. Now you have headless and don't need a keyboard or monitor.

3. Boot. Login. sudo raspi-config. Change password.

4. Connect printer via USB cable

5. Then execute the following sequence of commands to set up CUPS and make it accessible on the network.

sudo apt-get update
sudo apt-get full-upgrade
sudo apt-get install cups
sudo usermod -a -G lpadmin pi
sudo cupsctl --remote-any
sudo systemctl restart cups

6. Visit http://raspberrypi:631/admin and add the local printer. Make sure "sharing" is enabled on the printer.

7. Then make sure AirPrint is set up

sudo apt-get install avahi-daemon
sudo reboot

Printer should work now via AirPrint.

2021-07-08

Receiving the WWVB time signal in Portugal (by accident)

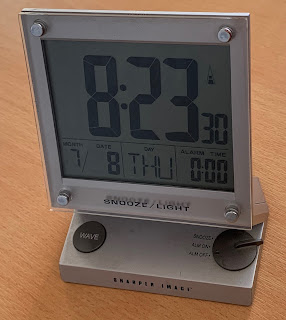
For many, many years I've owned a Sharper Image clock that sets itself from the WWVB time signal in Fort Collins, CO. Well, it used to set itself when I lived in the US. For much more than a decade the clock has sat by the bed and I've manually set it. And it dutifully looked for a time signal it never received. But it worked absolutely fine with manual setting.

Until last night. 

At some point between 0300 UTC and 0600 UTC the clock received the WWVB time signal and set itself to EST with DST enabled. This morning the clock was "off" by five hours based on time in Lisbon.

The NIST propagation chart for the night doesn't show the signal hitting Portugal but somehow my trusty little clock picked it up. Although it makes sense that it set itself between those hours as that's the best time to "hear" the signal outside North America.


It's about 7,700 km along the great circle route from Fort Collins to Lisbon but the signal made it! Since this is an LF transmission at 60kHz the likely path is via bouncing off the ionosphere. Given that at night such bounces might be 2,000 km long it's likely the signal bounced two to three times to reach Lisbon.


Perhaps even more surprising than the long transmission path is that the UK MSF time signal (which uses a different format) transmits on the exact same frequency and is way closer.

2021-05-25

Cloudflare's SSL/TLS recommender on plan28.org

The Plan 28 website is a small, static site that I really ought to move to Cloudflare Pages, but... currently it's running on a server that I rent. Since it uses SSL from Cloudflare I wanted to make sure that both the browser to Cloudflare and the Cloudflare to John's Server connections were encrypted. 

So I dropped into the Cloudflare Dashboard to check the settings.

Sure enough both connections were encrypted but it wasn't using the most secure option (Full (strict)) that requires a certificate on the server that Cloudflare can validate. That can either be one that Cloudflare issues or from a commercial or free CA.

Recently, Cloudflare introduced a service that automatically discovers the highest possible security setting for SSL on a site. So I clicked the button...

And let Cloudflare do its thing. Not long after I received an email saying that I could use Full (strict) already.

Which was a bit of a surprise because I didn't remember setting up a valid certificate on the server. But popping back into the Dashboard showed that Cloudflare was now recommending I use Full (strict) and so I clicked the button.

And it worked.

Which lead me to wonder what certificate the server was using. A quick check on the server showed me that I'd set up Cloudflare Origin CA years before and... forgotten. And sure enough there it is in the Cloudflare Dashboard.

So, if you have a Cloudflare account go click that recommender button and discover the highest security setting you can use today. And if it's not Full (strict) there are great options like Cloudflare Origin CA.

2021-05-11

Moving jgc.org to Cloudflare Pages

At work there's a cool product for deploying websites that has great integration with GitHub, it's called Cloudflare Pages. I use and pay for a lot of Cloudflare products but hadn't got around to using Pages. The nudge came when an old friend from university who has been managing jgc.org for 24 years(!) told me she'd like to decommission the server.

The actual content on jgc.org was originally generated by a Perl script that output static HTML. From time to time I'd modify the Perl, run it, and deploy the HTML using FTP. Really old school. Over time I moved to just running everything on the server without the FTP mess.

And, in reality, most of the content on jgc.org is on this blog, and that uses Blogger. So I decided to try Cloudflare Pages for the home page and go for the simplest possible page. It's all text and a single page and it looks like this:


It's a single HTML file containing a small amount of CSS for the colours and a small amount of JavaScript to make the function keys work. The amber colour is based on an actual amber terminal I used to use. It used the P3 phosphor which emits light at 602nm (which is close to #ffb700 in RGB using this converter).
The entire page is 3,451 bytes long and there are no images.

From never used Cloudflare Pages to a deployed HTML page in 8 minutes

Since I'd never used Cloudflare Pages before the first step was to create a project after signing into the Cloudflare dashboard:
The first step in that process was to connect my project to a GitHub account.

Since I have my account and the Cloudflare corporate account I was presented with a choice. 


And then had to authorize access on GitHub:


Followed by choosing a repository to use. Since I hadn't actually set one up it was off to GitHub to create one. I chose to use a private repository to see if that worked. It did.


A nice touch was that the Cloudflare Pages screen asking me to choose a repository automatically noticed that I'd created a new one.

I went with the default settings (which use the main branch).

I hopped over to the command-line, cloned the new repository I'd made, created a simple index.html page, committed it and pushed to main. 

Cloudflare Pages immediately started the process of deploying the page.


The entire process going from visiting Cloudflare Pages to set it up to having a deployed working page took a total of eight minutes! And of these I spent about three minutes creating the temporary HTML.

From there I was able to iterate on the page and just push to GitHub and let Cloudflare take care of the rest. 

Connecting it to jgc.org

But that still left the page on https://jgc-org.pages.dev/ and I want it deployed on jgc.org and www.jgc.org. Since I already use Cloudflare for jgc.org this was a matter of clicking on Custom Domains and choosing jgc.org. Cloudflare updated my DNS records automatically to point to Cloudflare Pages (after asking for confirmation):

I did the same for www.jgc.org and within seconds the new site was live.


All in all a very smooth experience and now I can simply use GitHub to manage the site (and spend my actual time adding more than just a single HTML page).

Conclusion

I've barely scratched the surface of Cloudflare Pages. My site is a single piece of HTML and doesn't use any cool parts of Jamstack. But with these smooth infrastructure I'm now free to work on the content without worrying about builds and deployment. I can even work locally and iterate on my machine, use Cloudflare Access to allow any collaborators to securely work with me, and I get privacy-preserving analytics. More about all that here.

If you're interested in reading more "Cloudflare's CTO tries out the company's own products" you might enjoy my journey deploying our "SSH terminal inside a browser" to connect to a Raspberry Pi 400.


2021-04-06

Aeronear: an ambient device showing nearby aircraft

Here in Lisbon it's common to see aircraft because the main airport is in the city rather than being on the outskirts. And for a long time I used FlightRadar24 to answer the question "where did that aircraft come from or where is it going to?"

But I really like ambient devices such as my Totoro that gives the weather forecast or bus that shows when the next bus arrives. So, it was time to use a few things I had lying around and make a desktop ambient aircraft monitor that looks like this:


This uses a Raspberry Pi Model 3PiTFT 3.5" touch screen (which is kind of wasted because I don't use the touch functionality), a 24 LED NeoPixel ring28BYJ-48 stepper motor, and the ULN2003 driver, and a small model aircraft. It's all contained in an acrylic pot that I got from Muji.

The screen shows flight information and model aircraft and LED show the current direction the aircraft is flying (the track) and where to look for the aircraft. The first time the device is started the direction of north needs to be calibrated by holding down the blue button on the back until the LED points to north, releasing the blue button and then holding it down once again until the model aircraft points in the same direction. Once done the code keeps track of the calibrated position in planes_position.py so that unless the device is moved to a different location no further calibration is needed.

The code can be found here. It's written for Python 3 and you'll need to sign up for the ADSB Exchange API and get an API key and configure it in planes_config.py. While you're in that file also set your latitude and longitude.


The ADSB Exchange API gives you information but I augmented it with lists of aircraft types, airports and airlines to improve the output on the display. 

2021-01-18

Dividing n elements into groups of at least size g minimizing the size of each group

At work there's a little project to break up groups of employees into random groups (size 4) and set up Zoom calls between them. We're doing this to replace the serendipitous meetings that sometimes occur around coffee machines, in lunch lines or while waiting for the printer. And also, we just want people to get to know each other.

Which lead to me writing some code. The core of which is 'divide n elements into groups of at least size g minimizing the size of each group'. So, suppose an office has 15 employees in it then it would be divided into three groups of sizes 5, 5, 5; if an office had 16 employees it would be 4, 4, 4, 4; if it had 17 employees it would be 4, 4, 4, 5 and so on.

I initially wrote the following code (in Python):

    groups = [g] * (n//g)

    for e in range(0, n % g):
        groups[e % len(groups)] += 1

The first line creates n//g (// is integer division) entries of size g (for example, if g == 4 and n == 17 then groups == [4, 4, 4, 4]). The for loop deals with the 'left over' parts that don't divide exactly into groups of size g. If g == 4 and n == 17 then there will be one left over element to add to one of the existing [4, 4, 4, 4] groups resulting in [5, 4, 4, 4].

The e % len(groups) is needed because it's possible that there are more elements left over after dividing into equal sized groups than there are entries in groups. For example, if g == 4 and n == 11 then groups is initially set to [4, 4] with three left over elements that have to be distributed into just two entries in groups.

So, that code works and here's the output for various sizes of n (and g == 4):

    4 [4]
    5 [5]
    6 [6]
    7 [7]
    8 [4, 4]
    9 [5, 4]
    10 [5, 5]
    11 [6, 5]
    12 [4, 4, 4]
    13 [5, 4, 4]
    14 [5, 5, 4]
    15 [5, 5, 5]
    16 [4, 4, 4, 4]
    17 [5, 4, 4, 4]

But the code irritated me because I felt there must be a simple formula to work out how many elements should be in each group. After noodling on this problem I decided to do something that's often helpful... make the problem simple and naive, or at least, the solution simple and naive and so I wrote this code:

    groups = [0] * (n//g)

    for e in range(n):
        groups[e % len(groups)] += 1

This is a really simple implementation. I don't like it because it loops n times but it helps visualize something. Imagine that g == 4 and n == 17. This loop 'fills up' each entry in groups like this (each square is an entry in groups and numbers in the square are values of e for which that entry was incremented by the loop).

So groups ends up being [5, 4, 4, 4].  What this helps see is that the number of times groups[i] is incremented depends on the number of times the for loop 'loops around' on the ith element. And that's something that's easy to calculate without looping.

So this means that the code is now simply:

    groups = [1+max(0,n-(i+1))//(n//g) for i in range(n//g)]

And, to me at least, that is more satisfying. n//g is the size of groups which makes the loop update each entry in groups once. Each entry is set to 1 + max(0, n-(i+1))//(n//g). You can think of this as follows:

1. The 1 is the first element to be dropped into each entry in groups.

2. max(0, n-(i+1)) is 'the number of elements left over once you've placed 1 in each of the elements of groups up to position i'. It's divided by n//g to work out how many times the process of sharing out elements (see the naive loop above) will loop around.

If #2 there isn't clear consider the image above and imagine we are computing groups[0] (n == 17 and g == 4). We place 1 in groups[0] leaving 16 elements to share out. If you naively shared them out you'd loop around four times and thus need to add 16/4 elements to groups[0].

Move on to groups[1] and place a 1 in it. Now there are 15 elements to share out, that's 15/4 (which is 3 in integer division) and so you place 4 in groups[1]. And so on...

And that solution pleases me most. It succinctly creates groups in one shot. Of course, I might have over thought this... and others might think the other solutions are clearer or more maintainable.